

Easy Flow Professional Food Decoration Master Set

When I took my first stab at cookie decorating I was TERRIBLE. No, really, it was that bad. I had been decorating cakes for a couple years and figured if I could master fondant, I could immediately master royal icing. So I did no research, I watched no videos, didn't obsessively read any cookie blogs. I just quickly looked up a royal icing recipe and got to decorating. When my husband saw my sad little cookies he quietly said "Those are cute…but maybe you just stick to cakes?" Oops!

Then I did my research. I scoured the internet and read every cookie blog. I enrolled in the University of YouTube and watched countless cookie decorating videos. And I practiced… and practiced… and practiced…
My initial attempt, and subsequent epic fail, wasn't entirely my fault. Royal icing is a jerk. It dries when you don't want it to. It doesn't dry when you want it to. You get a speck of oil in it and it'll never dry. Too thin and it'll drip down the sides of your cookies. A little too thick and it will never fully smooth out. You bump the table while your cookies are drying and you'll get these little speed-bump wrinkle thingies on the surface. You finally get everything perfect, the consistency is just right, the weather is ideal, the planets are aligned, Mercury is not in retrograde, you flood the cookie like a pro, everything is smooth and pretty…and then you accidentally stick your finger into partially dried icing, it cracks, and there is no way to fix it. So yeah, royal icing is a jerk.

If you Google "royal icing recipe" or "how to make royal icing" you'll get over 20 million results. And they're all a little different. Some will say to sift your sugar, some say don't bother. Use a whisk attachment. Never use a whisk attachment. Add corn syrup. Don't add corn syrup. You'll find recipes with anywhere from 5-10 tablespoons per 2 lbs of sugar. Or recipes that use raw egg whites instead of meringue powder. Start with a thick consistency and thin it down. Start with a flooding consistency and add more powdered sugar to thicken it. After experimenting with a few dozen of those 20 million recipes, I found what works for me.
Let's start with a little vocab lesson…
What is Royal Icing?
Royal icing is an icing made from powdered sugar, meringue powder and water. The egg allows the icing to dry to a hard consistency. You can also use egg whites instead of meringue powder and water, but meringue powder is going to be safer AND you can leave it out at room temperature longer than icing made with raw eggs.
What is Meringue Powder?
Meringue powder is a powdered egg white substitute used in baking. It also has cornstarch, vanilla flavoring, sugar and some stabilizers (like cream of tartar). I prefer CK or Fat Daddio's meringue powder, but Wilton's will work just fine and is more readily available at craft stores and retailers like Walmart.
What is "flooding"?
Flooding a cookie is the process by which you apply a smooth layer of icing to the surface of a cookie. Flooding icing should be thin enough so that it smooths out, but not so thin that it'll run off the surface of your cookie. You might also see flooding consistency icing referred to as "10-20 second icing." More on that in 3…2…1
Icing Consistencies
There are 3 different consistencies that I use when decorating cookies. Flood consistency, medium consistency and stiff consistency. The same ingredients are used for all 3 consistencies, the only difference is the ratio of water to powdered sugar. You add a little more water to thin the icing down, and more powdered sugar to thicken it up.
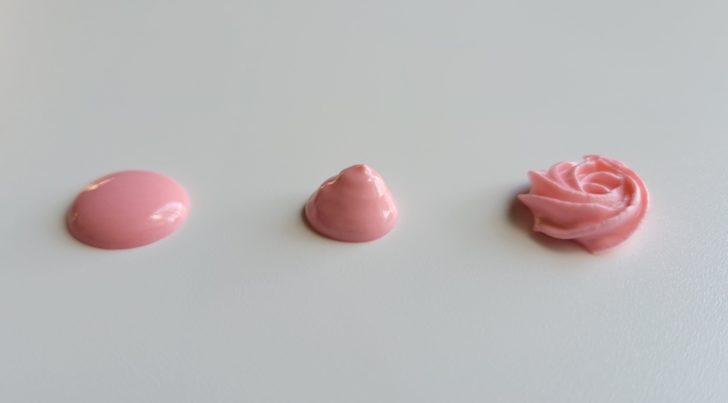
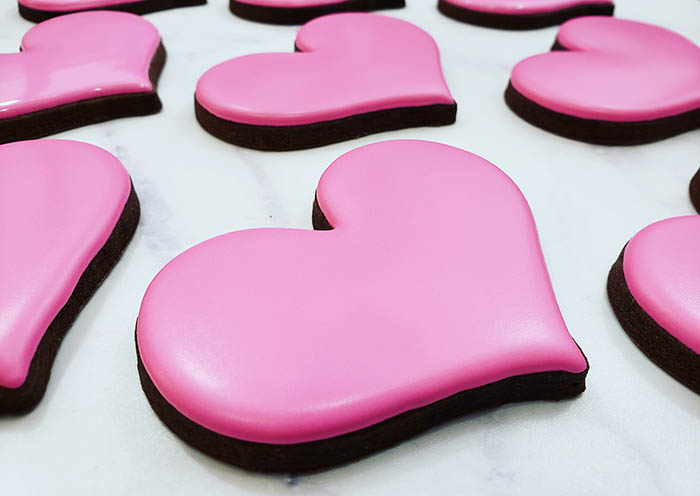
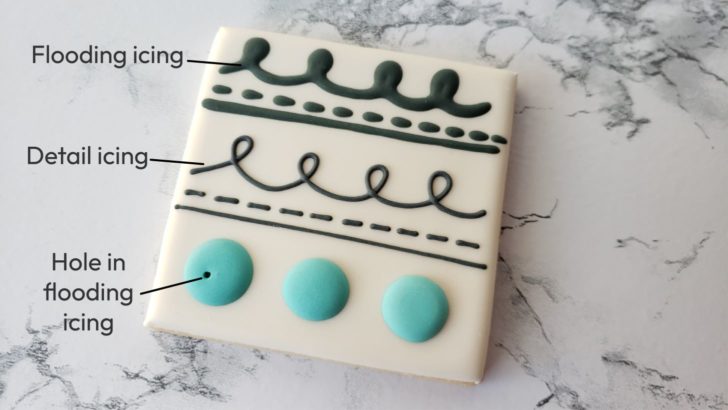
Flooding Icing
This is the consistency of icing used to create that super smooth layer of icing on a cookie. It's the consistency that comes right off the mixer when I make a batch of royal icing. Some cookie decorators start with a stiff icing and then thin it down, but since I use flooding icing the most, and because flooding a cookie is typically the first step in decorating a cookie, I start with a flooding consistency and then thicken it as needed.
The consistency of flooding icing should be like honey. You want flooding icing to be a little runny, not watery, and just thick enough to smooth out, but not so thin that it'll run off your cookie. Easy, right?
To achieve this perfect runny-but-not-too-runny consistency, I use the 10-20 second rule. Take your bowl off the mixer, smooth out the icing, pick up your paddle, drizzle a ribbon of icing along the surface, and then start counting. The ribbon of icing should smooth out on it's own somewhere between 10-20 seconds.
Tah-dah! Flooding icing. If it's too thick, use a spray bottle and spray a few squirts of water, mix it up, and test it again. If it's a little too thin, just let it mix for a couple of more minutes and it'll thicken up a bit. If it's WAY too thin, you can add a little more powdered sugar, a tablespoon at a time, until you reach the desired consistency.
Medium/Detail Consistency Icing
This is the consistency of icing I use to pipe outlines, details and flowing script. I also use this consistency for things like eyeballs and smiley mouths. You want this icing to be the consistency of soft-peak whipped egg whites. I've also compared it to the consistency of toothpaste. It should hold it's shape a little and not spread, but you can smooth it out with a scribe tool.
If your detail icing is too thick, the line tends to break when you are piping a design. If your detail icing is too thin, then it will spread, not hold its shape, and you will sometimes end up with little air bubble holes once it dries.
Stiff Consistency Icing
Stiff icing should be the consistency of stiff-peak whipped egg whites. It's spreadable, but able to hold it's shape. I use this icing for piping shapes like flowers and leaves, as well for making basket weave patterns, brush embroidery, and ruffles.
How much water do I use to thin down my icing if it's too thick?
It really depends on how thick your icing is, and how much icing you have. If you have an entire batch of icing that's very thick, you might need to use ½ cup of water to get it to the correct flooding consistency. Or you might just need a few squirts of water from your spray bottle to thin it down enough. If you have a small amount of icing that needs to be thinned down, you might only need a few drops of water.
My suggestion is to always add a little at a time. You don't want to add too much water, and then end up having to add more powdered sugar because you watered it down too much.
How much powdered sugar do I use to thicken up my icing if it's too thin?
It really depends on how thin your icing is, and how much icing you have. If you have an entire batch of icing that's very thin and watery, you might need to use ½ cup of powdered sugar to get it to the correct consistency. Or you might just need to add a teaspoon more to get it to the perfect consistency.
My suggestion is to always add a little at a time. You don't want to add too much powdered sugar, and then end up having to add more water because you've thickened it up too much.
Now, without further ado, here is my professional royal icing recipe.

- 2 lbs powdered sugar
- 7 tablespoons meringue powder
- ¾ cup warm water
-
Fit your stand mixer with the paddle attachment. Be sure that bowl and attachment are free of any oil or butter residue.
-
Dissolve meringue powder in ¾ cup of warm water.
-
Place powdered sugar into mixing bowl, turn on lowest setting and slowly drizzle in water/meringue mixture.
-
Add food colouring and mix for 8 minutes on lowest speed.
-
Add water as needed for a flood consistency (10-20 second icing) or powdered sugar as needed for medium or stiff consistency.
-
Immediately cover icing in an airtight container or transfer to piping bags/bottles.
- The icing will keep for up to 3 days at room temp and for 2 months in the freezer.
- Do not get any oil/grease in royal icing or it will not dry properly. You can wipe your bowl, spatula and paddle attachment down with vinegar or some lemon juice to remove any oil residue.
- Do not use any oil-based extracts if you want to flavor the icing, use only water-based extracts.
I've made a little video of me making royal icing. Yes, it's 3 minutes of watching a mixer mix icing, but if you have any questions about when to add ingredients, how long everything should mix, and what it should look like, the video will show you everything.
Source: https://paperstreetparlour.com/royal-icing-101-with-recipe/
0 Response to "Easy Flow Professional Food Decoration Master Set"
Post a Comment